Most racks do not fail because somebody bought the wrong steel. They fail because of the install. A home squat rack setup is three decisions stacked on top of each other: where the rack stands, what it stands on, and whether it gets bolted down. Get all three right and a modest rack will outlive your bar, your plates, and probably your truck. Get one wrong and you find out at 315, which is the worst possible time to learn anything about anything.
I'm Andre. I squat in a garage in Charlotte, North Carolina, three mornings a week before work, and I've been competing in powerlifting for fifteen years. Before that I spent four years as a welder's apprentice, which is why I read a bead the way most people read a spec sheet. Over the last six years I've assembled, loaded, and deliberately abused nine squat racks, including one that bowed at 405 and a wall mount that pulled its top bolts straight out of a stud.
What follows is the setup process I actually run, in order, with the checks that matter and the ones that are just noise. Along the way I'll point you at the two racks I'd hand a first-time garage lifter: a pair of adjustable stands and a single-frame adjustable rack. They solve different problems, and picking the wrong one for your space is the most common mistake I see.
Why you should trust me
My best raw squat is 500 pounds and my best deadlift is 605, both pulled in a garage I built bolt by bolt on a budget after my old gym doubled its membership price in 2019. I've failed reps at 495 and had nothing but the safety bars between that bar and my neck. That is the entire reason I care about this subject.
The welder's apprentice years are the other half of it. I learned to read penetration before I ever touched a barbell, and it ruined me for marketing. A pretty bead with no penetration is a lie wearing a tuxedo, and no powder coat on earth hides a cold lap once you know where to look.
I keep a grease-pencil logbook of every rack that has been through my garage: tube gauge, where the welds sit, bolt torque, and the exact weight where the wobble starts. When a rack goes back on the truck, I write down why. That logbook is the reason I don't get excited about capacity stickers anymore, and it's the reason this guide is about the install first and the hardware second.
How I picked and how I tested
I don't review racks by reading the box. Every rack I look at gets run through four questions, in this order.
First, what gauge is the steel, really. Sticker or calipers, those are the only two answers, and one of them is usually fiction. Second, where are the welds and do they penetrate. I want to see the upright-to-base junction up close, because that is where a rack either holds or folds. Third, what does the base do under load. A base that walks across the floor under a heavy set is telling you something the product page will not. Fourth, and this is the only question that ultimately matters: would I trust it to catch a missed rep at the weight I actually train with.
That fourth question is why I'm going to be straight with you about the two racks below. Neither one is the rack I'd load to my own working weight, and I'm not going to pretend otherwise, because a guide that pretends is just a capacity sticker with paragraphs. What they are is a legitimate starting point for a garage where the loads stay sane, the budget is real, and the alternative is not training at all. That is a real job, and both of these do it.
For a stand pair I check whether the uprights are adjustable through a useful range, whether the feet are wide enough to resist tipping, and whether the hardware that ships in the box is worth installing. For a single-frame rack I check the same things plus how the frame handles a 6-foot bar versus a 7-foot bar, because that difference changes where the rack can live in your garage.
The racks worth bolting down
One of these is a pair of independent stands and one is a single frame. Read both before you decide, because the answer depends on your ceiling, your floor, and how heavy you actually plan to go.
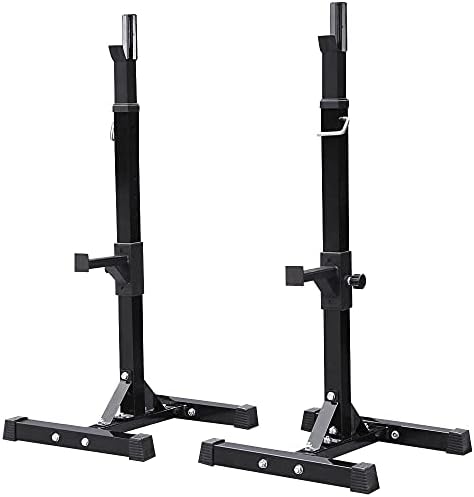
Budget pick: Yaheetech Adjustable Squat Rack Pair, Barbell Bench Press Stands, Home Gym
 Visit on Amazon →
This is a pair of adjustable stands rather than a cage, and that distinction is the whole review. A stand pair gives you two uprights, a place to rack a bar, and a footprint you can move out of the way when the car needs to come in. What it does not give you is a built-in safety system, so your safety plan has to come from somewhere else, whether that's spotter arms that match the uprights or a policy of never training alone near your limit.
Where a pair like this earns its place is a garage with a low ceiling, a tight parking situation, or a lifter doing bench work and moderate squats without a permanent footprint. The height adjustment is the useful part, since you can drop it for bench and raise it for squats instead of owning two pieces of equipment.
Before you order, read the listing carefully for what actually ships in the box, because a stand pair and a full rack are different animals and the photos do not always make that obvious.
Flaws but not dealbreakers: Independent stands do not share a frame, so nothing ties the left side to the right side except the floor underneath them. That is fine on a level slab and miserable on a sloped one. Level the floor or move the rack before you blame the product.
Anyone in a rental, a low garage, or a shared space where the rack has to disappear on weekdays will get the most out of a pair like this.
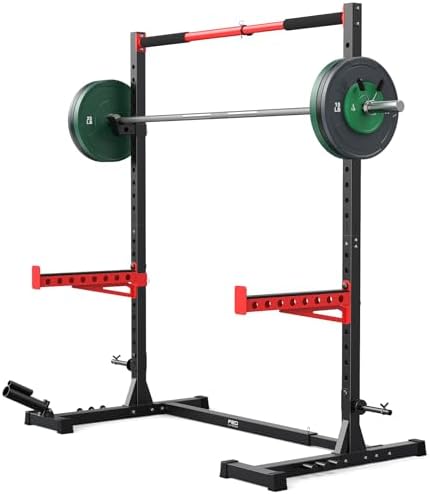
Our pick: FLYBIRD SR1 Squat Rack, Adjustable Power Rack for 6FT/7FT Barbells
 Visit on Amazon →
This one is a single frame built around 6-foot and 7-foot barbells, which is the first thing to check against your own bar. A 6-foot bar and a 7-foot bar are 72 and 84 inches of steel, and if your rack is sized for one and you own the other, you find out the hard way on your first racked set. Measure your bar before you measure anything else.
A single frame is the better answer when you want the uprights tied together, want one footprint instead of two, and want the rack to stay where you put it. It also gives you a defined inside space, which matters for bench work and for figuring out where your safeties go.
When it arrives, inspect the upright-to-base junction before you assemble anything. That is the joint that carries every rep you'll ever do, and it is the one place a return is still easy. If the hardware in the box looks like it came from a hardware store bin rather than a grade-8 bin, replace it before you load the rack, not after.
Flaws but not dealbreakers: A frame rack takes up more floor than a stand pair and it is heavier to move alone. Get a second person for assembly and plan the spot before you open the box, because once it's together you will not want to drag it across the garage.
Anyone with a dedicated training corner, a standard bar, and a plan to squat and bench in the same spot every week should start here.
The actual setup workflow
This is the part that decides whether your rack is furniture or equipment. Work through it in order.
Step one: Measure the space, not the rack. Ceiling height first. Then bar length, because a 7-foot bar needs 84 inches of clear travel plus plate room on both sides. Then think about overhead pressing, which needs a different ceiling height than squatting does. A rack that fits your squat but not your press is a rack you'll resent by month three.
Step two: Look hard at the floor. Garage slabs are often sloped toward the door for drainage, and a rack on a slope rocks no matter how well you assembled it. Put a 4-foot level down where the rack will live. If the floor is out of level, find the flattest square of concrete in the garage and build there. Do not shim a rack, because shims compress and a compressed shim is a wobble with a delay on it.
Step three: Inventory the hardware before assembly. Count the bolts, washers, and nuts against the parts list. Look at the bolt heads and check whether the grade is marked. If the kit ships with soft hardware, buy grade-8 replacements at a hardware store for a few dollars. This is the cheapest upgrade you will ever make to a rack.
Step four: Assemble loose, square it, then torque. Snug everything by hand first. Measure the diagonals from corner to corner and adjust until they match, which is how you know the frame is square. Only then torque the bolts down, and torque them in a cross pattern, not around the perimeter. Write your torque values in a logbook, because you will want them again in a month.
Step five: Inspect the welds on arrival, not after you load it. Go straight to the upright-to-base joint with a flashlight. You are looking for undercut, cold lap, and porosity. A wide, even bead that fuses into both pieces is what you want. If the weld looks like a caterpillar sitting on top of the steel instead of melted into it, send it back before you assemble it, because after assembly nobody wants to hear about it.
Step six: Set the J-hooks. Height first, so the bar sits at a comfortable unrack for both squat and bench. Then check the hooks themselves. A cheap hook that tips forward when you re-rack crooked will do it at the worst possible moment. Load the bar, rack it slightly off center on purpose, and see what the hook does. If it tips, replace it.
Step seven: Set the safeties, and this is the step that matters. Your safety bars should sit just below the bottom of your squat, so you touch them only when you fail. Set them too high and you cut your depth short. Set them too low and they are decoration. Test the height with an empty bar first, then with a light working set. If the safeties on your rack are rated below your working weight, stop there and deal with it before you go heavier, because a safety that fails is worse than no safety at all.
Step eight: Run a loaded stability test. Load the bar in steps and watch the base. Watch the uprights. Watch the feet. If the frame moves at 225, it moves worse at 315, and no amount of tightening will fix a design problem. Do this test on a day when you have time to be patient, not five minutes before a session.
Step nine: Anchor it or accept the trade. A wide flat-foot rack on a level slab can hold without anchors. A tall frame or a stand pair on a sloped floor should be anchored, and concrete wedge anchors are the right hardware for a slab. If you are going into a wall, find the stud with a stud finder and confirm it with a small drill bit before you trust it. A wall mount that misses the stud is holding your face with drywall.
Step ten: Re-torque after a month and mark the floor. Bolts settle. A month of training will loosen things that felt tight on day one. Walk the rack with a wrench, check the torque, and put grease-pencil marks on the floor at the base corners so you can see at a glance whether the rack has walked.
The competition and why it lost
The categories that lose to these two in a garage are worth naming, because the reason is usually the room rather than the steel.
Full power cages with four posts and a pull-up bar are the best thing you can own if you have the space, and if you have a dedicated 8 by 8 corner with a 9-foot ceiling, go buy one and skip this article. In a two-car garage that has to hold two cars, a full cage loses on footprint alone.
Wall-mounted and folding racks lose to the stud layout more often than to anything else. They are excellent when the studs land where you need them and a nightmare when they don't, because you end up with a plywood backer and a rack hanging off your wall at an angle you'll stare at for years. If your studs are not where the rack wants them, a flat-foot frame wins by default.
Half racks and stand pairs without any integrated safety lose on one thing only: the catch. A rack's job is to catch a failed rep, and if the rack cannot do that, you are relying on your own discipline every single session. That works right up until the day it doesn't.
And anything advertising a four-figure capacity on thin tube loses before the box is open. If the sticker and the gauge disagree, believe the gauge.
What this all costs
The stand pair sits at the entry point and the single frame sits above it, and you should check current Amazon price on each before you decide, because that gap is the entire decision. What you are buying with the extra money is a tied-together frame, a defined inside space, and less floor movement under load.
Do the math in years, not in dollars. A rack you set up correctly and re-torque once a year is a ten-year purchase, and a rack you bolt down in a panic after it walks on you is a mistake you keep paying for. Divide whatever you spend by the number of sessions you'll train in the next decade and the difference between the two racks in this guide rounds to nothing.
Then budget for the things nobody mentions: grade-8 replacement hardware, concrete anchors if you need them, a level, and a torque wrench. That is the real cost of a home squat rack setup, and it is small compared to the cost of finding out your safeties were set wrong.
Set the rack up once, properly, and it disappears from your life. It holds the bar, it catches the miss, and it does it for years without asking for anything. That is the job. Everything else is a sticker.